>U Mom Knows Best: Home Improvement
Showing posts with label Home Improvement. Show all posts

Dreametech H11 Wet and Dry Vacuum Makes Cleaning Simple

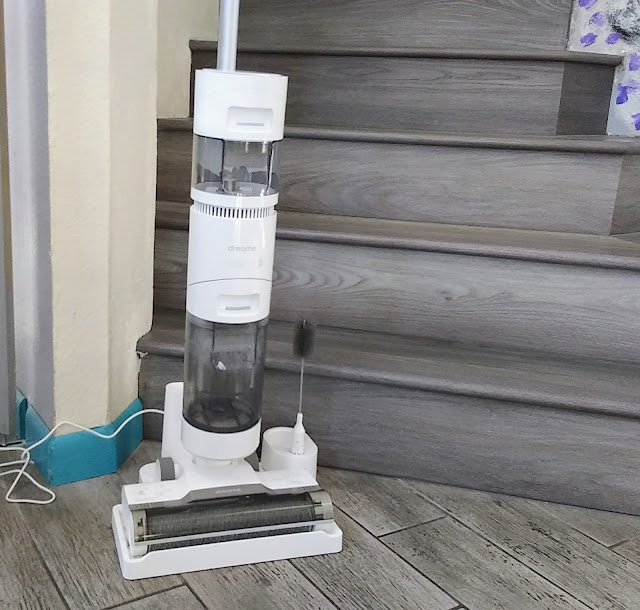
 The Dreametech Cordless H11 Wet and Dry Vacuum is a game-changer for cleaning floors. This device replaces your broom, mop, and vacuum. It is a pleasure to push.
This page may contain affiliate links. As an Amazon Associate, I earn from qualifying purchases I received a Dreametech H11 Wet and Dry Vacuum to facilitate this post.

 We recently replaced the carpet in our house with new floors. Two years ago we ripped out all the carpet downstairs and had ceramic tile installed. Then this year we tore out the carpet on the stairs and upstairs. This time we decided to install vinyl on the floors. The carpet was over 20 years old and it was a pain to keep clean. So my husband and I selected flooring choices that were easier to maintain. 

 Another reason that we decided to not install carpet was due to all my allergies. While my high-quality air purifier was helping, my asthma symptoms were still present. So not having carpet in the house on the floors made sense as it would help me continue to manage my asthma naturally without prescription medicines. Carpet tends to trap dust and all those allergens, so I was glad to see the carpet being replaced.

 Since we replaced the carpet with vinyl floors in the bedrooms, my sleep apnea symptoms have even stopped. I am loving the new floors in my home and the part that I love most is how easy the floors are to keep clean. I no longer have to vacuum or steam clean carpets. My maintenance for my new floors only requires a broom, vacuum, and a mop. My cleaning routine has become easier without having carpet in my house. Even spills are easier to clean up.

 Dreametech H11 Wet & Dry Vacuum Makes Cleaning a Breeze

 I loved that I did not have to lug out the big vacuum and plug it in. My routine for cleaning my new floors was using a stick vac followed by a wet mop. A cleaning routine that I thought was simple. That was until I received a wet and dry vacuum that was a huge game-changer in my daily cleaning. The Dreametech H11 Wet & Dry Vacuum was a more convenient and fun home cleaning experience.

 This unique cleaning device vacuums and mops at the same time. So I was able to replace my mop, broom, and vacuum with the  Dreametech H11 Wet & Dry Vacuum. The Dreametech vacuum was even fun to use. Yes, you heard that right cleaning was fun with this vacuum.


Erases household messes, both wet and dry

 + One pass. All clean.

+ Cleans up wet and dry messes at the same time.

+ Self-cleaning on the roller brush as long as it is on.

+ Automatic mess detection for deep cleaning.

+ Long runtime for cleaning large homes.

Easy to use

 The Dreametech H11 Wet & Dry Vacuum was super simple to put together from the box. My teen simply connected the handle to the vacuum and then install both the clean water tanks and the dirty water tanks. The vacuum came with a charger base so this vacuum was a cord-less vacuum. I liked that the charging base was not bulky. So it fits perfectly in my kitchen.

 After the Dreametech H11 Wet & Dry Vacuum was fully charged, I was ready to have fun cleaning my floors. A push of the button was all it took. I was pleasantly surprised at how easy this wet/dry vacuum was to push. It was a self-propelled vacuum that had two different modes of cleaning ~ standard clean and deep cleaning mode. The fully charged vacuum was able to clean all the floors in my house on a single charge. I was also surprised that I did not have to refill the clean water tank.


Deep clean. Up to 2,152ft

No longer need to refill the water tank over and over. The Dreametech H11 comes with a clean water tank of 0.23gal that covers up to 2,152ft² in the lowest water flow mode.

Deep cleans floors

 I like clean floors and I usually mop my floors daily. I also enforce the no-shoes in the house rule. So my floors stay clean for the most part. So the first time I used the Dreametech H11 Wet & Dry Vacuum, I was amazed at how dirty the water was in the used water tank. I realized that my old way of cleaning the floors with a mop was just pushing dirty water on my floors. So while my grey floors looked clean, they were not clean. 


 My downstairs floors are ceramic tile so they have grout lines. The grout on my floors is grey as I selected that color to hide the dirt. The Dreametech H11 Wet and Dry Vacuum sure did show me that my floors did a great job of hiding the dirt. The water in the used water tank was black by the time I was done cleaning the floors.

 I decided to clean the floors a couple more times with the Dreametech H11 Wet and Dry Vacuum and the water still was dirty. I was amazed at how well this wet vacuum cleaned my floors. I was even able to vacuum up the sand that was by the front door. This vacuum handles both wet and dry messes. So it made cleaning up all the crumbs in the kitchen a breeze. Next time my son spills milk and cereal, the Dreametech H11 will make clean-up so simple.

Self-cleaning roller brush

 Another awesome feature of the Dreametech H11 Wet and Dry Vacuum is the self-cleaning of the roller brush. Once you are done cleaning the floors, you place the vacuum back on the charging base and press the deep-cleaning mode. The deep-cleaning mode thoroughly cleans and drys the brush roll so there is no need to manually wash it. I love that I don't have to touch a dirty roller brush.


 This wet and dry vacuum has changed the way that I keep my floors clean. Since the Dreametech H11 Wet and Dry Vacuum has a clean modern look to it, I keep the vacuum in the corner of my kitchen. The charging base keeps the vacuum fully charged so it is ready to use. So that means I am able to clean the daily food crumbs and kitchen messes. My floors have never been this clean.

 So the next time my son bakes the best Christmas sugar cookies with way too many sprinkles, he can use the Dreametech H11 Wet and Dry Vacuum to clean up his mess. With cleaning the floors made so simple, I just may let my son do more baking. No longer do I have to dread kitchen messes when I have the power of the Dreametech vacuum.


Check out some more information about the Cordless Dreametech H11 Wet and Dry Vacuum

 + Sucks up all the dirty messes in one path, combining the actions of a broom, mop, and vacuum in one. 

+ Using a separated two-tank design, the 900ml clean water tank sprays out fresh water and a cleaning solution onto the roller brush while the internal dirt separation system removes dirt water out of the brush and sends it to the dirty water tank in real-time. 

+ The self-cleaning of the roller brush in real-time, you can try the deep-cleaning mode by putting it back onto the charging base for a thorough cleaning and fast drying of the brush roll, no need to manually wash it.

+ The smart LED screen display and intelligent voice assistant provide clear and accurate operation guidance.

+ The convenience of a cordless system like this requires getting it back on the charging base at the end of use but the smart screen on top will tell you battery power.


Buy the Dreametech H11 Wet and Dry Vacuum on Amazon 


9 Simple Ways To Refresh Your Bedroom

 Check out these simple ideas that will make your bedroom feel brand new without a huge effort.


You know the feeling. Your bedroom looks outdated or you are just tired of the way it looks. Walking into your bedroom does not bring you joy. It may do just the opposite and you no longer get excited about spending time in your bedroom. You wake up every morning wishing that your room looked nicer. Then you realize the amount of time it would take to remodel your bedroom. So you don't change the look of your bedroom.

 Do you want to refresh the look of the room but you don't want to put in a lot of effort? 

 Changing the look of any room in your house can be done, without spending a huge amount of time or money. So before you start painting the walls or buying new furniture, check out these simple ways to refresh your bedroom space. 

1. Change your Sheets and Comforter

 Something as simple as replacing your bedding with new items may help the room look nicer. So change your sheets and blankets. You may have some sheets in your linen closet that you have not used in a while or you may want to purchase new bamboo sheets. Replacing your bedding does not have to mean spending a lot of money as you can buy a duvet cover to place over your comforter. Some places even sell sheet sets that include duvet covers. So replace your old bedding with new ones. While you are buying new sheets, take the time to replace your pillow. Pillows wear out and a new pillow may just help you sleep better.

2. Get a Rug

 The floor may be the first thing that you notice when you walk into a room. So adding a rug to your floor will make a huge difference. That rug can be as simple as a decorative throw rug or it can be a big rug that you place under your bed. Rugs are a great way to make old carpets and floors look new again.

3. Add Plants

 Plants and flowers always brighten up any room. It is like bringing the outdoors inside. Plants come in many different colors and will add a special touch to your bedroom. Some plants are also great for keeping the air clean. Don't worry if you don't have a green thumb. There are plenty of options for plants that don't need water or sunlight. A silk plant or a vase of silk flowers will still make your bedroom bright and cheery.

4. Swap out the Curtains

Over time curtains and blinds start to fade or collect dust. Your curtains may simply be outdated or you may no longer like them. So swap out the curtains in your bedroom with new curtains. Choose a pattern or color that makes you smile. When you wake up in the morning, the curtains are usually the first thing you see.  Bedroom curtains are an inexpensive and easy way to have a little fun with your bedroom decor. If you like your bedroom super dark when you sleep, then select blackout curtains. If you love waking up with the sun, maybe a sheer curtain would be best. 

5. Make some Shelves

 Adding shelves to the wall will not only refresh your bedroom but they will also give you some extra storage space. Shelves are great for showcasing all those small items that are special to you. You can also use a pair of shelves for books or to display photos. I like using shelves for plants and I discovered a way to make shelves from broken furniture. Shelving comes in many different sizes so think of what you want to display before you buy them.

6. Add Texture to a Wall

 So many people think that they have to paint walls to refresh their bedroom. Sure a new coat of paint in a different color will make a bedroom look nice but painting walls is time-consuming. Painting means moving furniture, covering up items with tarps, and taping up the walls.  Painting is an all-day project.

 There is an easier way to change the look of your bedroom walls without having to use paint. A wall mural is a simple way to refresh any room and it can add excitement to the look of the room. Adding a wall mural to one wall of the bedroom will brighten up your room in a big way. You can select any size for your wall mural. The mural can cover the whole wall or it can a pop of color to a smaller section of the wall. The best wall surface cover is one with texture. Surfaces & textures provide visuals that capture your attention and make the room look so beautiful. For some wall surface inspiration, check out https://www.photowall.co.uk/wall-murals/surface-textures  

7. Move Items Around the Home

 Giving your bedroom a new look does not always require a trip to the store or any money. It is as simple as taking a walk around your home. Look in the other rooms of your home for some items that may look better in the bedroom. That may mean a picture in the living room or a vase from the dining room just might add that special touch to your bedroom. Think outside the box. A teacup may be the perfect item to place on your bedside table to hold those small items. Even a piece of furniture from another room may have a different purpose in the bedroom.

 When considering adding a new piece of furniture to your bedroom, a stylish crushed velvet bed can be a game-changer in transforming the space. These beds, known for their luxurious texture and sophisticated appearance, can serve as the centerpiece of your bedroom, instantly elevating its style and comfort. Crushed velvet has a unique way of reflecting light, adding depth and richness to the room's aesthetic. Incorporating a crushed velvet bed can seamlessly blend with various decor styles, making it a versatile choice for those looking to refresh their bedroom's look with a single, impactful update.

8. Get Inspiration

Sometimes just looking at other bedroom ideas online or in stores, may give you the inspiration for your new bedroom. Head to Pinterest for ideas for bedroom remodeling. Other places to visit for inspiration are home decor stores. Some places have room displays that showcase the bedroom products. Magazines can also give you some inspiration for bedroom decor.

9. Remove the Clutter

 One of the best ways to make a room look new is simply the process of decluttering. All the extra items that you no longer use can make a room look cluttered. So, remove items from the top of dressers and take out furniture that you are not using. That exercise machine that you have not used in months or all those books on your bedside table are eyesores. Those eyesores could be making your bedroom look ugly to you. Even removing clothes that you no longer wear from the closet can refresh your bedroom. So take time to declutter.


DIY Broken Dresser Shelves With Semi Exact

 Don't toss the broken furniture to the curb. Instead, transform it into beautiful shelves or wall desks in a couple of hours.

I received samples from Semi Exact to facilitate this post

 I have been busy these past couple of weeks. My husband and I decided to tear out all the carpet upstairs and on the stairs. We will be replacing the carpet with vinyl planks. This project has been in the making for a couple of years as the carpet is over 20 years old. We wanted to replace the carpet after our tile renovation project. Our flooring project was put on hold last year thanks to Covid but now we are renovating the whole upstairs.

 My college kid is in his last year of school so it was a perfect time to move the next child into his bedroom and the other child out of the loft. So with the younger boy not using the loft for a bedroom, that meant we could finally have an exercise room upstairs. So I went into full remodeling mode. My bathroom renovation project in 2017 helped me discover my love for home decorating.

 New floors, meant painting the loft and also my bedroom. My bedroom is being transformed into a tropical beach theme while the loft got a fresh coat of paint. To rip out all the old carpet, we had to move furniture and stuff from all the upstairs rooms. That gave us a perfect opportunity to declutter and giveaway furniture we no longer need. 

My DIY broken dresser project

 As I was moving furniture, I discovered that my son's dresser had a broken drawer. This dresser had been broken for quite some time and was no longer able to be fixed. My son was using the dresser for his Nerf gun collection and it was falling apart. I was ready to put the dresser to the curb as it was made from particleboard wood. My husband already had a collection of particleboard and wood scraps in the garage. So he said, toss the dresser to the curb for trash day.

 As I was taking the dresser apart, I then realized that the drawer fronts would be the perfect size for shelves for my new exercise room. So I took apart the old dresser and measured the drawer front pieces. They were 10 inches wide and would be a perfect size for a shelf. I could place my plants on these shelves. Now all I needed was some paint and shelf brackets.

I was ready to reuse this broken dresser and save it from filling up the landfill. I hate throwing things away when they can be recycled or reuse. My motto is to reduce reuse, recycle. I like eco-friendly projects that help the environment. 

Materials needed for my DIY wall shelves

+ Dresser pieces ~ These shelves can be made from any scrap pieces of wood. While I got my wood from an old dresser, you can use wood from an old bookcase or any other broken furniture. You can also buy the wood pieces from a home improvement store.  Check the store's scrap wood for inexpensive wood.

+ Paint ~ Since I like saving money and saving the environment, I decided to use the leftover paint from the bedroom walls to paint the shelves. So check your paint stash before you buy new paint. The paint that I used was semi-gloss as that is what I had. If you are purchasing paint, buy gloss paint so the shelves can be easily cleaned. You can also stain the wood.

+ Paint Brush ~ I used a foam brush but you can also use a paint roller.

+ Shelf Brackets ~ I used these Semi Exact Hairpin Shelf Brackets as I loved the way they looked. These shelf brackets come in many different colors and sizes. So you can buy the size that fits your wood piece. I love that the brackets have a bright powder coat finish. The Hairpin Shelf Brackets are versatile and can be hung in two different ways. These simple shelf brackets add a clean bright look to any wall.

+ Screws or wall anchors

 You can even make instant wall desks with the Hairpin Shelf Brackets. Get the easy how-to instructions HERE

Less than 2 hours to transform a broken dresser into wall shelves

These shelves were so easy to make. Taking apart the dresser was simple and I made sure to save the other dresser pieces for other projects. The thin cardboard dresser backs were perfect to use as a painting drop cloth. I used the smaller dresser pieces so I could view my sample paint color selections for my bedroom walls. 

 I loved that I did not have to sand or cut the wood pieces as they were prefinished in the size that I needed. The shelves were ready to paint with the leftover paint from my bedroom painting project. I just love this pink color.

While the paint was drying, my husband helped me hang the shelf brackets on the wall. The Hairpin Brackets already had pre-drilled holes in them. If your shelf pieces are longer, make sure to put the brackets over wall studs. If you are not able to use the wall studs, make sure to buy some wall anchors. So your shelves will be secure on the wall. 

 Once the brackets are up on the wall, slide the painted wood pieces through and enjoy. These wall shelves sure do look nice in my new exercise room. I really love the colors that I selected of fuchsia and turquoise. They are perfect for my plants and other items. If you want to know more about these Hairpin Shelf Brackets, head over to semiexact.com to see all the beautiful colors and sizes that are available. This unique company sells other items to transform reclaimed wood into furniture like tables, beds, and more. Semi Exact believes that furniture can be well made and well designed, cost-conscious and planet-conscious, easy to order, and easy to treasure year after year.


The Best Black Friday Deals At Lowes

Black Friday is the perfect start to home improvement projects

Sponsored post

 In the past couple of years, my husband and I have been busy with some home improvement projects. These remodeling projects have always started with a trip to a home improvement store. While at the hardware store for something like a piece of wood, we always like to browse other departments to look at the latest appliances and other home improvement products. Then the dreaming starts and my husband and I begin to plan our next project in our home as we work to update our home. Three years ago, we started our bathroom remodeling project after we had some extra money from a car insurance settlement. My husband's car was totaled and since he was taking the bus to work we decide to use the money to renovate our master bathroom instead of buying a new car. The ironic thing is the bathroom project costs were half the amount of what a new car would cost. Keep reading to find out all the details about Lowes Black Friday Ad!


  This year our home project was installing new floors downstairs as the carpet was 22 years old and in bad shape. We decided to embark on this home improvement project after I went to Lowe's for their Black Friday sales last year. I think I went shopping at Lowes for a birthday present for my husband. My husband was born on Thanksgiving so I always take advantage of Lowe's Black Friday deals for his present. I love saving money for gifts and lowe's always had great discounts after Thanksgiving. My husband loves to receive things like tools and other home improvement items for his birthday. So as I was looking for a present for my husband, I had to look at the flooring section as I was tired of looking at my dirty worn carpet that was in my house.


 While browsing the flooring section of Lowe's, I saw ceramic tiles that looked like wood and this is what started our new flooring project. I wanted the look of wood in the downstairs area of my house but I wanted the durability of tile. So when I got home from shopping, I convinced my husband that it was time to replace the downstairs carpet with ceramic tile. My husband liked the idea of having no carpet and also loved the wood look of the porcelain tiles that I selected. I loved the idea of how much easier it would be to clean the tiles. We ended up installing this tile in the family room and the entryway. We installed carpet in the two front rooms that don't get much traffic.


Head HERE to see the Lowe's Black Friday 2019 AD.


  I am known for my discount shopping and for the use of coupons when shopping. So I love shopping the sales on Black Friday. This is the time of year when the stores offer some amazing discounts. When I shop the sales on Black Friday, I like to head to Lowe's for things for the house. This is the best time to replace appliances. One year I scored a great deal on a microwave and another year I was able to get a new dryer for a great price. I also find amazing deals for my husband's birthday presents. One year, my Lowe's find was a new fancy drill for my husband and the year before that it was a firepit. I also love scoring deals on the paint at Lowe's as we always need paint for our home remodeling projects. Now that my son lives near us we can take advantage of his military discount and no longer need those 10% coupons that Lowe's offers.


I haven't seen the Lowe's Black Friday ad for this year so I am not sure what I will be buying my husband for his birthday gift or holiday gift. Yes, while I am shopping for my husband's birthday, I also buy his Christmas gift. My husband has been wanting a compressor for his workshop so I am hoping that they will be on sale. My husband could use a new trimmer for the yard or a new drill.


I am hoping that Lowe's has some awesome large appliance deals as I have been wanting to replace my refrigerator now that I have a new stove in my kitchen. A counter-depth fridge that matches my oven range would be ideal. That way my appliances all match. My fridge is over 10 years old and may need replacing. I just love looking at all the new appliances at Lowe's as I love checking out all the new features. I love to open the doors on the large appliances so I can see what they look like on the inside. 

More Ways to Save at Lowe's on Black Friday
  • The Lowe's Advantage credit card offers 5% off your purchases, but make sure to read all the terms and conditions before you apply to see if it's right for you.
  • Be sure to compare competitors' prices. Lowe's Price Match Guarantee is available in-store on Black Friday, which means you could score an extra discount if you find a lower price elsewhere.
  • Lowe's offers a 10% discount for all active military personnel and veterans. Once you register, you can use the discount online or in-store.
  • Be sure to check Lowe's rebate center to find or track rebates for the items you've purchased.
Did you know that Lowe's has a Price Match Guarantee that is available in-store and you can take advantage of this on Black Friday? Check out other ways that you can maximize your savings on Black Friday. Head HERE to see all the details about Lowe's Black Friday Deals.

What are your favorite items to buy at Lowe's?


Before And After Pictures Of My Bathroom Renovation

My bathroom renovation is finally complete.


  It has been a long six months since my husband and I embarked on our journey to renovate our master bathroom. It all started with me planning to go out of town for four days and husband left home to watch the boys. My husband had nothing planned for those four days, so on a whim, I asked him if he would like to renovate the bathroom. We had been talking about doing this for several years but life kept getting in the way. My husband agreed that my idea was a great thing. So we went to a tile store to get started. The lady at the store convinced us to expand the shower and eliminate the bathtub. We loved the idea of a bigger shower as ours was too small. So we picked out the tile for the floor and shower. I then went out of town and left the boys in charge of demolishing the bathroom. Well during the demolishing, my husband discovered problems that changed our plans which led to delays. Those delays allowed me to do a lot of "window" shopping online to choose items that I wanted in my bathrooms. I also had a couple more trips to get inspired by hotel bathrooms. Hotel bathrooms have always inspired me to redo my bathroom, maybe because they are clean and clutter-free. I think having four boys has something to do with my messy bathroom and yes that is football by my old toilet. The only boy allowed in my new bathroom will be my husband and he better keep it clean.


  So the above photos are how my bathroom looked and the rest are the new fancy bathroom. My new bathroom just looks awesome and I feel so happy when I am in there. It looks so much better than the bathrooms at my past hotel stay. I might just have to stay at fancier hotels. I just love all the space I have in the new vanity and shelf to keep all my items organized. The shower is huge and I may just invite hubby to take a shower with me. The only thing that would make this bathroom more perfect would be a jacuzzi. We did think of that but in the end, we knew we would enjoy a bigger shower. I am glad we had the money to make the bathroom how we wanted as it turned out wonderful. So here are the photos of our new bathroom!


I just love the height of my new vanity and all the storage that it has. The darker color is called java brown and it amazing. The sink part has the sinks molded into the top so it is one piece. It looks like granite but it is not.


 The shower is huge as this is the space that the bathtub was. The shower doors have a textured pattern on them so that will hide all the hard water stains. I just love the look of the big tiles in the shower and the pebbles on the shower floor. The pebble stones are slightly raised so they massage your feet when standing on them.


  Here are some close-up pictures and ones of special touches. I never knew that I could experience joy from a new toilet. The one that we bought is chair height and it feels so good to sit on a new potty. We used the extra stones from the shower for this candle trivet.


I love having this shelf for all my beauty products. It helps me to keep it so organized. The shelf fits perfectly in the space that was once the shower. 


This rack is great for all my jewelry and hair items.


So loving my dragonfly hooks! These will be great for hanging our shower robe and clothes on.


 I just love this sea glass mirror and the color we chose for the vanity. Yes, this sink is all one piece! This coffee cup is perfect for the soap as it will keep the drips off the vanity.


This open shelf used to be a medicine cabinet. This will keep the clutter off the vanity. We just removed the door from the medicine cabinet and then painted the shelves and frame with gray paint. The open look looks so nice and will force me to keep things organized.


Love the light we chose! It was so unique and it gives off so much light.


These cute guys give our bathroom a southwest touch! My husband bought these from a guy at his work that makes these by hand.


These shelves in the shower will hold all my shampoo bottles! We installed four shelves so there is plenty of room for all our shower items like soap and razors. The stones on the shower floor give my feet an awesome massage as it feels so good to stand on them.


I am so happy with my bathroom. It is my favorite room in the house. I will leave you with the before and after photos. The transformation is simply amazing! I am glad that we finally remodeled our master bathroom. The difference is so amazing in this bathroom.

Before

                                                                           After


Before

                                                                         After


data-matched-content-rows-num="2" data-matched-content-columns-num="2"
Mom knows best