>U Mom Knows Best: dairy-free recipe
Showing posts with label dairy-free recipe. Show all posts

Gluten-free Salted Chocolate Caramel Chia Seed Protein Pudding

Creamy and delicious is what this Gluten-free Salted Chocolate Caramel Chia Seed Protein Pudding is all about. Made with gluten-free and dairy-free ingredients; it's a healthy snack loaded with protein, fiber, and healthy fats!


 Looking for a guilt-free dessert that is a powerhouse of nutrition? Look no further as this Gluten-free Salted Chocolate Caramel Chia Seed Protein Pudding is loaded with nutrition. This dairy-free pudding is packed with protein, fiber, and plenty of chocolate goodness. The best part is how simple this gluten-free dessert is to make. Just combine a couple of healthy ingredients and you will have an amazing dessert that is good for you. This dessert is so healthy, that you can even enjoy it for breakfast. The hardest part of this creamy pudding is waiting for it to thicken up.

 So make sure to prepare this healthy recipe, the night before, so it is ready to enjoy the next day. Best tip ever ~ make several of these healthy pots of pudding, so you have plenty to share. These dairy-free desserts will keep for several days, so make plenty. That way you can grab a dairy-free protein pudding when your hunger sets it. These plant-based puddings contain 15 grams of plant-based protein, so they are perfect for after your workout or a quick out-the-door breakfast.

Sponsored post with Viva Naturals

 Salted Chocolate Caramel Chia Seed Protein Pudding is 

+ Creamy

+ Gluten-Free

+ Dairy-Free

+ Plant-Based

+ Vegan

+ Protein Packed

+ Full of Fiber

+ Rich in Healthy Fats

+ Soy-Free

+ Delicious

+ Easy to Make

 For those who follow a plant-based diet and avoid gluten, this Salted Chocolate Caramel Chia Seed Protein Pudding is perfect for you. Even if you don't follow a special diet, you need to try these cups of salted caramel chocolate treats as they are so delicious. I like to enjoy the dairy-free treats in the afternoon for a healthy snack. Of course, I also enjoy the pudding for breakfast and as a late-night snack. If your breakfast is the same day after day protein smoothie, then mix things up with this protein pudding topped with sliced strawberries.

Save 15% on Nuzest with code MOMKNOWSBEST15 


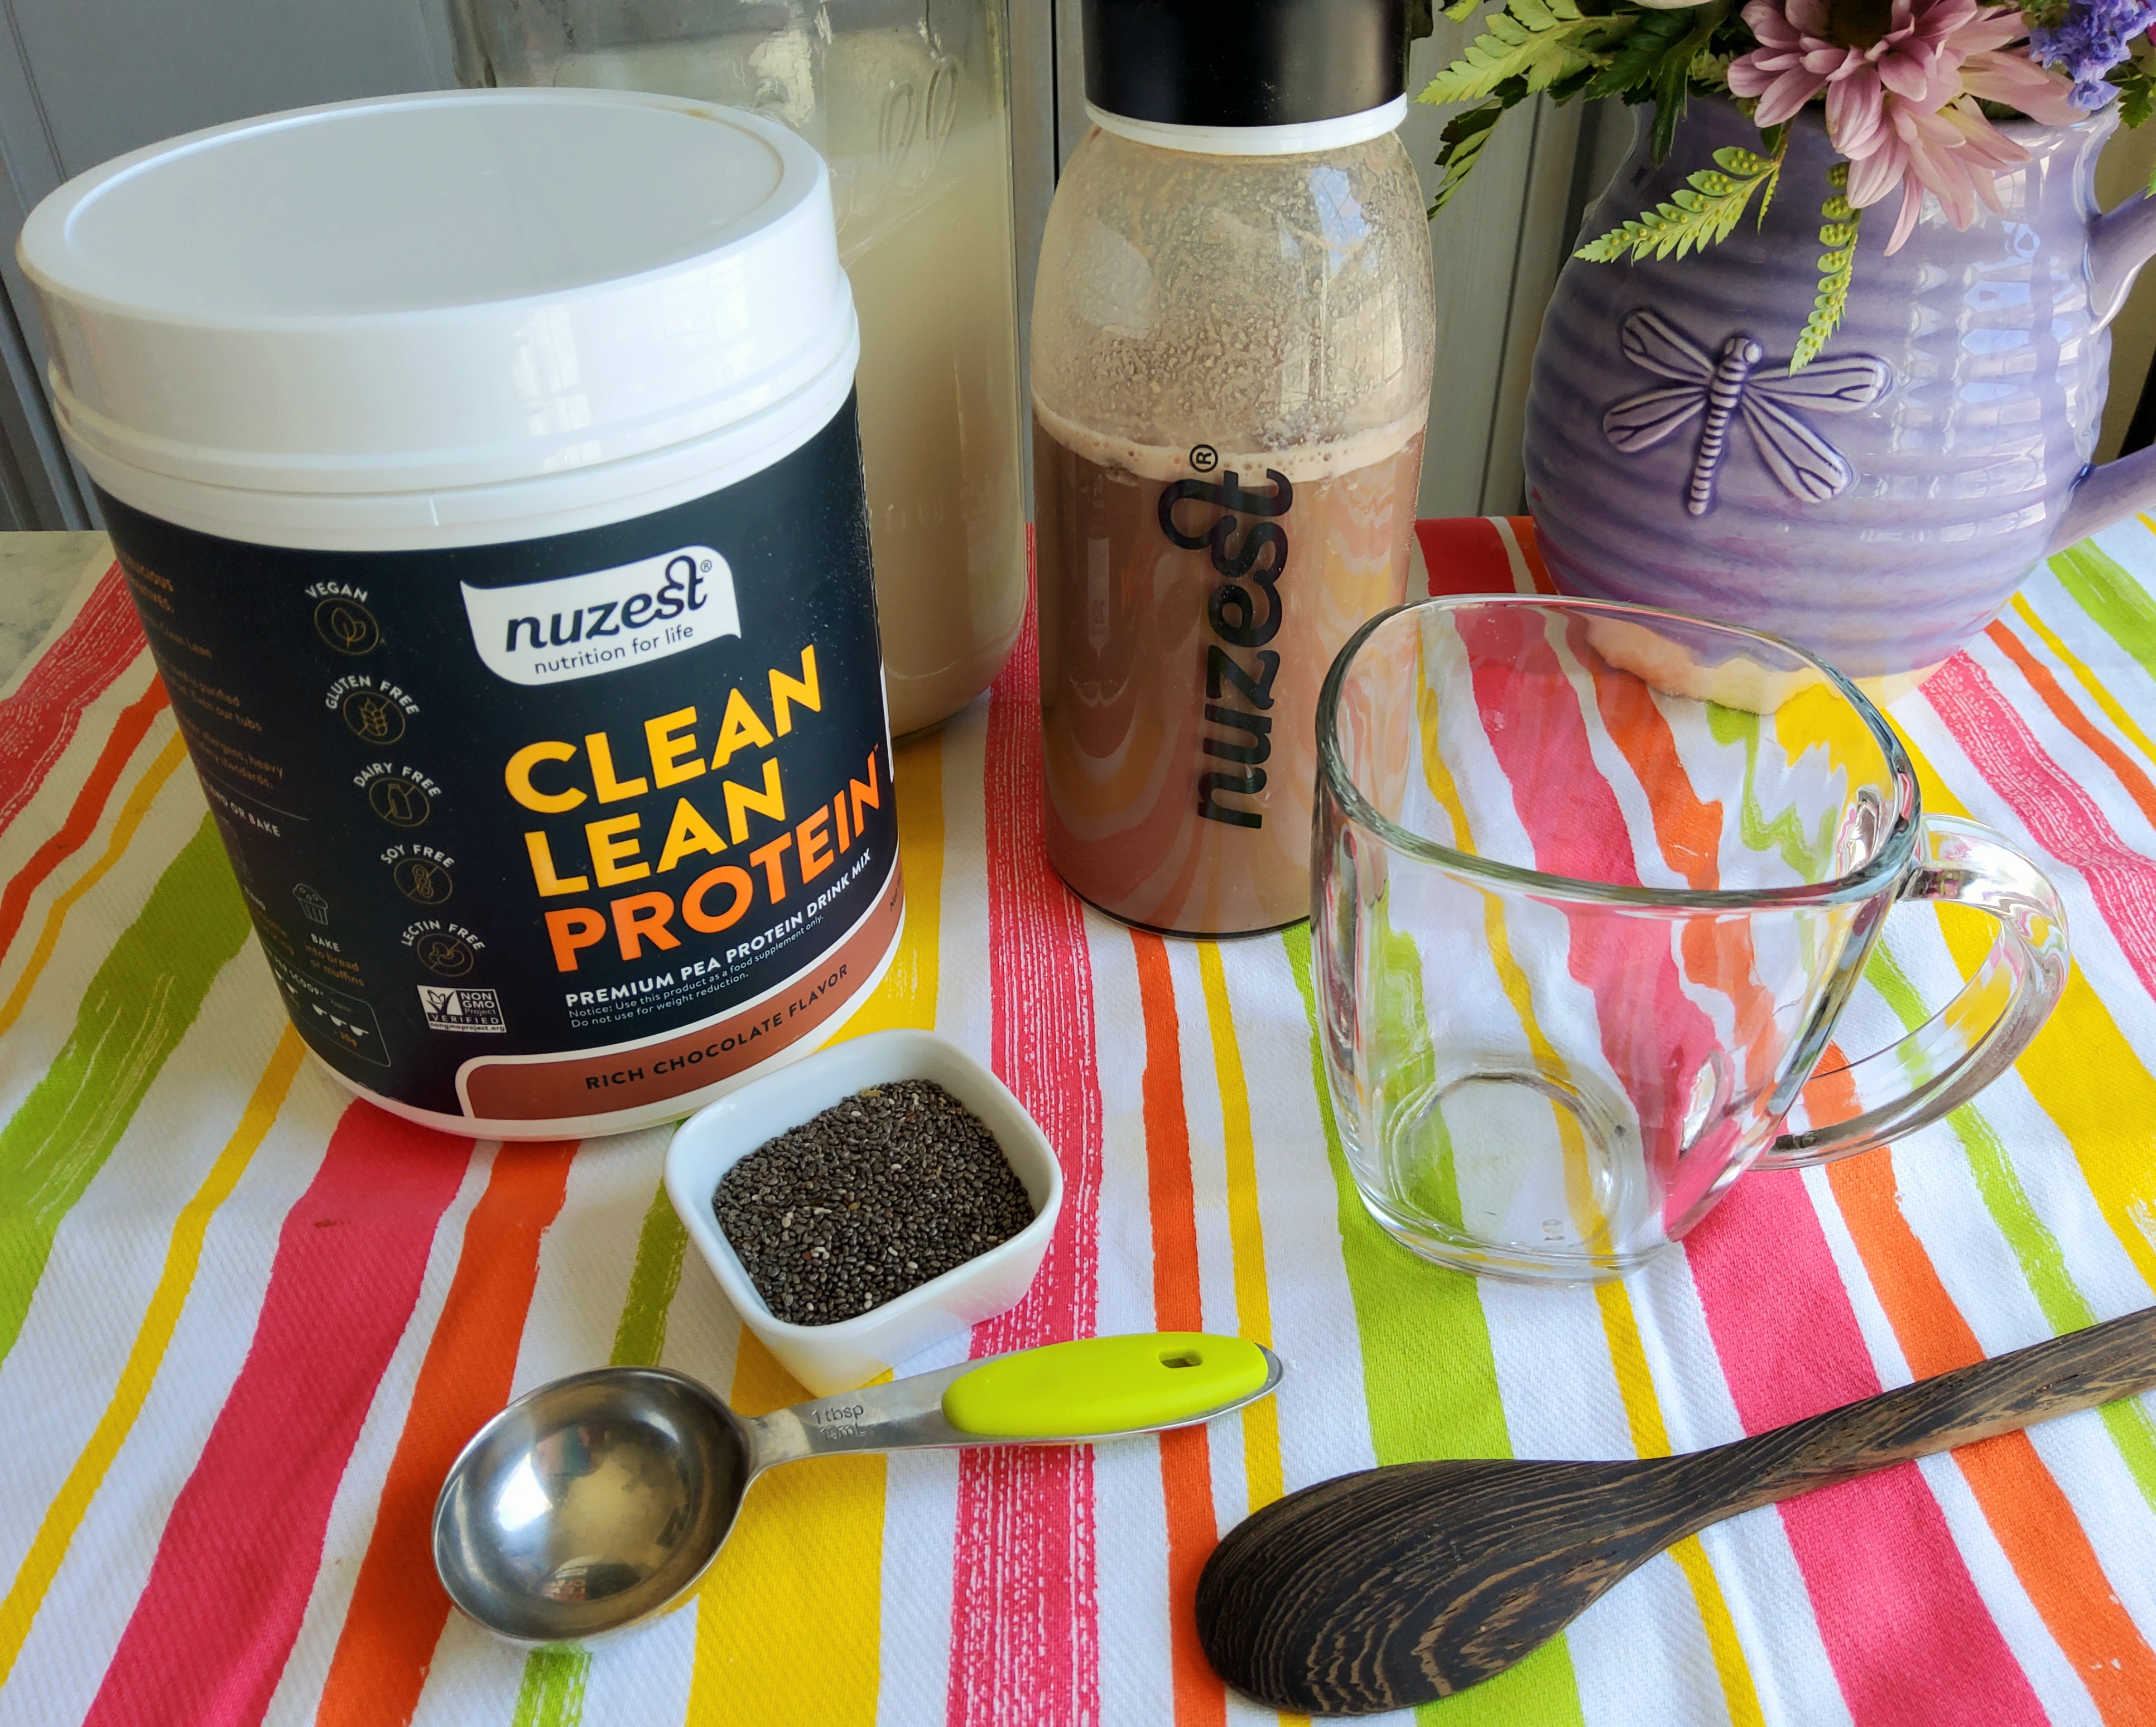
Ingredients needed for Chia Seed Protein Pudding

+ Plant-based protein powder ~ I like Nuzest Rich Chocolate. This plant-based protein is allergy-friendly, gluten-free, and made with clean ingredients. Nuzest is also low in carbs and sugar. Use my coupon code MOMKNOWSBEST15 to save 15%.

+ Plant-based milk ~ You choose your favorite plant-based milk. I like using this quick and easy homemade oat milk.

+ Chia Seeds ~ Make sure to grab organic certified gluten-free chia seeds. Save 10% OFF organic food with the code ORGANIC.

+ Vegan  Caramel & Sea Salt Chocolate Spread ~ My favorite vegan chocolate spread is a rich Belgian dark chocolate spread that is also gluten-free, nut-free, and low in sugar. Use my coupon code MOMKNOWSBEST to save 15% at https://www.lekkco.com/

+ Slice Strawberries ~ I prefer sliced strawberries with my Salted Chocolate Caramel Chia Seed Protein Pudding but you can omit this ingredient or use your favorite fruit.

Tiny Superfood Big Nutrition

 Viva Naturals Organic Chia Seeds have plant-based omega-3 and 6 fatty acids and are also high in fiber to support a healthy, balanced diet. Serve up big nutrition with these tiny seeds in your smoothies, oatmeal, yogurt, or salads! 


 I like adding chia seeds to my plant-based recipes and they are a staple in my plant-based pantry. These tiny seeds are loaded with nutrition and I add them to my daily smoothie for many reasons. Chia seeds add fiber and protein to my smoothies as well as healthy fats. I love how these superfood seeds swell up when added to liquids. Chia seeds can also be used as a plant-based egg replacement in many vegan recipes.

It is the chia seeds in this recipe that turns plan-based milk into pudding. I purchase my chia seeds from Viva Naturals as I know that I am getting the best organic gluten-free chia seeds. Sure chia seeds are gluten-free by nature but when I buy chia seeds from Viva Naturals, I don't have to worry about cross-contamination. 


 May is Celiac Awareness Month and Viva Naturals has a variety of Gluten-Free Products available on its website. From chia seeds to quinoa, you can feel safe when you purchase gluten-free organic foods at Viva Naturals. All of Viva Naturals' gluten-free products are certified gluten-free as well as organic, vegan, kosher, non-GMO, paleo, and keto. It is their promise to you, so you can feel safe when you purchase your pantry staples from Viva Naturals. Buying chia seeds from Viva Naturals is way better than buying from the bulk section at the grocery store, as who knows what could be lurking in that bin or scoop. Organic chia seeds are also very affordable.


How to make  Salted Chocolate Caramel Chia Seed Protein Pudding

 Making this chia seed pudding is so simple. Grab a small mason jar with a lid and pour in the plant milk of your choice. Then add a scoop of vegan protein powder to the non-dairy milk and place the lid on the jar. Shake it up well. You can also use a portable blender. Then add the chia seeds and place on the lid again. Shake well and place it in the fridge for several hours, preferably overnight. That way the chia seeds can swell up to thicken the milk.

 In the morning, grab a glass and the Lekkco chocolate spread along with some sliced strawberries. Soften the Salted caramel chocolate spread in the microwave for 10 seconds. Then have fun layering the chia pudding, chocolate spread, and strawberries. The Salted Chocolate Caramel Chia Seed Protein Pudding is ready to eat. 

Save 15% off with code MOMKNOWSBEST on all Lekkco vegan chocolate spreads 


Looking for another healthy breakfast option ~ check out this Tropical Overnight Oats recipe.

Here are the links & coupon codes for the ingredients for this delicious dessert

+ Nuzest Plant-Based Protein ~ save 15% with code MOMKNOWSBEST15 https://nuzest.com/

+ Viva Naturals Chia Seeds ~ save 10% with code ORGANIC https://vivanaturals.com/

+ Lekkco Salted Caramel Chocolate Spread ~ save 15% with code MOMKNOWSBEST https://www.lekkco.com/

Pin this recipe on Pinterest for later

Easy No Bake Dairy Free Peanut Butter Chocolate Granola Bars

Stop buying store-bought granola bars! You will be amazed at how easy it is to make homemade granola bars. These delicious bars are perfect for breakfast and after-school snacks.

 
 Granola bars are delicious and make for great healthy snacks. Most people buy packaged granola bars at the store for convenience and think that they are healthy. Most store-bought granola bars are loaded with sugar and unhealthy ingredients so they can be similar to eating a candy bar. The granola bars that contain nutritious ingredients are usually expensive. 

 Homemade granola bars are easy to make and can save you money. Making granola bars at home allows you to custom-make them to fit your dietary needs. A few simple ingredients are all it takes to make delicious granola bars at home. When you make your own granola bars, you can control the amount of sugar. You can also mix in your favorite granola bar ingredients. If you have food allergies you can omit certain ingredients or use ingredient substitutions. These granola bars can be made for all types of diets, from gluten-free to dairy-free. If you use homemade sunflower butter they can be nut-free granola bars.


No Bake Dairy Free Peanut Butter Chocolate Granola Bars

+ Are Dairy-Free
+ Gluten-Free
+ Full of Fiber
+ Made with Healthier Ingredients
+ Made with Plant-Based ingredients
+ Can be made Nut-Free
+ Lower Sugar Content

 My family loves granola bars. My boys love to pack granola bars in their school lunches and also eat them for after-school snacks. So we buy a lot of granola bars and that can be costly. The store-bought granola bars can also be high in sugar and have dairy in them. I hate when we go shopping and my boys offer me a granola bar and after reading the ingredient list, I discover that I can not enjoy a granola bar. The trouble is dairy is in so many foods. So I now make a lot of my food at home since discovering that dairy was the cause of my severe allergy and asthma symptoms. 

Ingredients Needed For Homemade Granola Bars 

+ Oatmeal
+ Peanut Butter or Your Favorite Nut Butter
+ Coconut Oil
+ Maple Syrup 
+ Salt
+ Vanilla Extract
+ Chocolate Chips
+ Sunflower Seeds or Your Favorite Nut
+ Optional Add-In Ingredients
  
 With a few simple changes, most of my favorite recipes can be made dairy-free. My favorite allergy-friendly recipe was the amazing chocolate pretzel pie that I made for the holidays. These delicious granola bars are made with plant-based ingredients that are also vegan. The granola bars are also gluten-free and could be made nut-free by swapping out the peanut butter with a nut-free spread like homemade sunflower seed butter. Check out my recipe for no-nut butter cookies which are allergy-friendly cookies.


Homemade Granola Bars Are

+ Healthy
+ Plant-Based
+ Loaded With Fiber
+ Make Great Snacks
+ Perfect for School Lunches
+ A Grab and Go Breakfast Option
+ Dairy-Free
+ Gluten-Free

Homemade granola bars taste amazing


 I decided to make some homemade granola bars for my kids. I found an easy recipe and loved that it was lower in sugar than the store-bought granola bars. I also love that I could use Viva Natural Coconut Oil in my dairy-free granola bars. Since I am all about nutrition, I added sunflower seeds to my delicious DIY granola bars for some added protein. Of course, I added chocolate to my recipe as everything tastes better with chocolate. I am so glad that Enjoy Life, an allergy-friendly company, makes yummy dairy-free and vegan chocolate chips. Using oatmeal as an ingredient makes the granola bars gluten-free. For those that have kids with peanut allergies, just use sunflower seed butter instead of peanut butter.


Healthy granola bars are great for snacks


Coconut oil makes the granola bars so good and healthy!

 You could omit the coconut oil in this recipe but I do not recommend it. Coconut oil not only gives it a great taste but it really helps the ingredients bind together so the granola bars are not crumbly. You mix in the coconut oil while it is melted but then the coconut oil goes back to a solid form after you place it in the fridge and that keeps all the tasty ingredients together. Viva Natural Coconut oil is vegan, paleo, keto, gluten-free, soy-free, non-GMO, and 100% raw! I love using coconut oil in my homemade granola recipe

Tip: place a sheet of wax paper over the granola bars for mess-free pressing

So easy to make


  These No-Bake Dairy-Free Peanut Butter Chocolate Granola Bars were so easy to make and are so easy to pack in a lunch box. I just wrap them in wax paper and then store them in a container in the fridge. That way my boys can grab one for when they make their school lunch. These yummy granola bars will be perfect for my boys to bring to school for parties. I think the next batch that I make I will add some chia seeds or flax meal so they are superfood meal bars. You could even add pumpkin seeds.

Different add-in ingredients
+ pumpkin seeds
+ flax seeds
+ dried cranberries
+ chia seeds
+ dried dates
+ sliced almonds


Pin this recipe on Pinterest so you can make it later.

Easy No Bake Dairy Free Peanut butter Chocolate Granola Bars


Easy No Bake Dairy Free Peanut butter Chocolate Granola Bars
Yield: 12
Author:
A delicious healthy after school snack

ingredients:

  • 2 cups oatmeal
  • 1 cup peanut butter or almond butter
  • 1/4 cup maple syrup
  • 1/4 cup coconut oil, melted
  • 1 teaspoon vanilla extract
  • 1/2 cup vegan chocolate chips
  • 1 cup sunflower seeds, optional

instructions:

How to cook Easy No Bake Dairy Free Peanut butter Chocolate Granola Bars

  1. Combine the oatmeal, peanut butter, maple syrup, vanilla extract, and melted coconut oil in a medium-size bowl. Stir until well combined. 
  2. Stir in chocolate chips and sunflower seeds.
  3. Line an 8x8 pan with parchment paper, allowing the paper to fall over the edges. Press the oatmeal mixture into the pan.
  4. Place in the refrigerator for1 hour, or until firm. Remove paper from pan and then cut the large square in half. Then cut each half into 6 rectangles. Wrap bars individually with plastic wrap or wax paper and store in the refrigerator.
  5. Note: To make these granola bars healthier, add two tablespoons of chia seed, flaxseed, nuts, pumpkin seeds, or sunflower seeds. Just add 1 tablespoon more honey for each addition.
Created using The Recipes Generator

Simple Roasted Beets In The Pressure Cooker

You will never buy beets in the can again once you discover how delicious roasted beets are. They are so easy to cook. This is a pressure cooker or instant pot recipe.


 Most people don't like the taste of beets. They may have been turned off by them when they tried them from a can. Can beets can be bland and mushy. If you are not a fan of beets, you need to give them another chance with this roasted beet recipe. Roasting beets brings out an amazing delicious taste.

 My husband used to not like beets until he tried one that I roasted in the oven. After my husband tried my oven-roasted beets, he was hooked and now he always reminds me to buy fresh beets when I go to the store. I too love roasted beets and use them in many vegan recipes like beet hummus and beet salad. I just don't care for how long they take to cook in the oven. So when I bought a pressure cooker, I was amazed at how easy beets are to cook in the pressure cooker. The best part is that you do not have to peel the beets before cooking.

Roasted Beets are:
+ Healthy
+ Vegan
+ Plant-based
+ Easy to make
+ Loaded with nutrition 
+ Fiber
+ Helps lower blood pressure
+ Loaded with antioxidants


 Cooking beets in the pressure cooker is great for those hot summer days when you don't want to turn on the oven for over an hour but want a healthy plant-based meal. Another plus of cooking beets in the pressure cooker is you can press a button and walk away. The pressure cooker will beep when the cooking is complete. I love my pressure cooker for many other recipes like cooking beans for my homemade spicy carrot hummus. I also make baked beans in my pressure cooker. This cooking device cuts most of my cooking time in half.

Tip: If you don't own a pressure cooker, you can use an instant pot. The instant pot cooks the same as a pressure cooker.


  I have even heard of people making yogurt in the pressure cooker but I prefer to make yogurt with an electric blanket. I need to also discover how to cook tamales in a pressure cooker. Tamales are a family favorite here and I love how easy tamales are to make in the slow cooker. I usually make tamales for Sunday dinner as I place them in the slow cooker before church and when we come home the tamales are done. My family then has a delicious vegetarian meal for lunch.

Don't toss the beet greens


 You can purchase your beets in red or gold. I like the red ones best for flavor and they look so pretty in my purple beet hummus. You can also buy beets with the greens attached or ones with them cut off. The beets with the greens attached usually are sold by the bunch and the beets without the greens are sold by the pound. I usually buy the beets without the greens as they are easier to put in the bag. When I buy the beets with the greens attached for the purpose of cooking the greens, the cashiers tend to smoosh my delicious greens. If you buy the beets with the greens, you simply cut them off the green portion and saute them with some oil until tender. Beet greens are so delicious. You can also chop the greens up and add them to vegetable soup.


 If you don't have a pressure cooker, you can make the beets in a slow cooker, just make sure to add water as I have cracked the crock to a slow cooker when I followed a recipe for baked potatoes that used no water. When I cook the beets in a slow cooker, I like to wrap the whole beets in foil to help them steam better and I cook them on high for 4-6 hours or until the beets are tender.

Pin this recipe for later on Pinterest

Simple Roasted Beets In The Pressure Cooker

Ingredients
2-4 large raw fresh red beets
1 cup of water

Directions
 Wash and scrub the beets with a vegetable brush. Cut off both ends on the beets. Pour the water into the pressure cooker and place the wire cooking rack inside the pot. You can also use a metal steamer basket. If you misplaced the wire rack that came with your pressure cooker and you don't have a steam basket, you can place the beets directly in the pot with the water. Placing the beets above the water on a rack will make them less mushy. Put the lid on the pressure cooker and cook on high for 40 minutes. Then use the quick-release to let the steam out. Let the beets cool down. When the beets are cooled down, run them under cold water to peel off the skin. By running the beets underwater, your hands are less likely to turn purple. You can also wear gloves to avoid staining your hands purple. If your hands do turn purple, it washes off with soap.


Don't have a pressure cooker? Then check out how easy it is to roast beets in the oven.

https://www.momknowsbest.net/2019/01/easy-roasted-beets-in-oven.html


Check out my recipe for beet hummus
https://www.momknowsbest.net/2017/12/easy-beet-white-bean-hummus.html

Dairy-Free Rosemary Sugar Cookies Made With Sola Low Calorie Sweetener

I am not going to let a dairy allergy get in my way of baking cookies

          I received a package of Sola Sweetener to facilitate this post.

 I love baking cookies for Christmas as it is my favorite part of the holidays. Since discovering dairy to be the cause of my out of control asthma, I had to learn how to bake without butter and milk. I never thought I would get excited about store-bought cookies that were made with dark chocolate, vegetable oil, or cocoa powder. Having a dairy allergy has been tough when it comes to making sugar cookies as I know that real butter is essential for the best flavor. So I have been experimenting in the kitchen and using vegan butter in my favorite cookie recipes. I have been discovering that vegan butter is more oily than regular butter so using a bit less in my cookie recipes has helped. I think that also may have to do with the high altitude as I live in the mountain region. I remembered the first time that I made chocolate chip cookies when we moved here and how the cookies spread way too much on the cookie sheet when baking. So I always use less butter when baking cookies and that is also good for my families health. I also try to cut back on the sugar when making treats so since I was making these cookies allergy friendly, I decided to try a low-calorie sweetener in this dairy-free recipe. I am glad that I was able to use real flour in my cookies.


  I discovered Sola at a conference that I attended last month and after trying it in my coffee, I knew that I had to try it in baking. This low-calorie sweetener actually tasted like sugar and did not have that bad after-taste that most sweeteners have. I liked that it looked like real sugar and measured like real sugar. So I decided to see if Sola could past the test of my family in my Rosemary Sugar Cookie recipe. This recipe is a family favorite and my boys have been asking me to bake them. My boys also like my Holiday Cinnamon Spiced Sugar Cookies that I make after Thanksgiving with pumpkin pie spice.

 Sola is a blend of ingredients that, when combined, taste, bake, caramelize, and measure just like sugar. 

 I was amazed that the Sola Sweetener along with the vegan butter creamed up like real sugar and butter do. I made this batch of cookies with the no-roll version as I did not have the time to wait for the cookie dough to chill. My boys enjoyed helping me roll the cookie dough into balls. They are doing a great job when it comes to baking and learning how to remove hot items from the oven. My youngest son made chocolate zucchini bread the other day and did not need my help. I just supervised from the family room. The stand mixer makes it so easy for my son to bake by himself.

 My husband was not home when I made the cookies so I did not tell him that I used a low-calorie sweetener in the cookie recipe. My husband does not like low-calorie sweeteners and can tell when I have used them in recipes, like the time that I made a sugar-free mousse from a mix. My husband did know that I used vegan butter as he won't let me eat foods with dairy in them as he hates to see me coughing up a lung. My husband liked the cookies and did not notice a difference in flavor. I knew that they passed the family test when my boys kept asking if they could have another cookie. My husband kept telling the boys to leave my dairy-free cookies alone so I would not sneak cookies made with dairy like I did last week, and coughed all night. The funny thing is while my husband was telling the boys not to eat my dairy-free cookies, he kept sneaking them so these cookies went fast.


                                       Dairy-Free Rosemary Sugar Cookies
                                           Made with low-calorie sweetener

Makes about 4 dozen cookies

3 cups flour     
1 teaspoon baking soda
1/2 teaspoon salt
1 tablespoon fresh rosemary, finely chopped
3/4 cup vegan butter, room temperature
2 large eggs or vegan egg substitute 


In a large bowl, beat the butter and Sola sugar until light and fluffy. Beat in the eggs. Then combine the flour, baking soda, salt, and rosemary in a separate bowl. Gradually mix in the flour mixture into the butter mixture. Mix until well combined. Cover the dough with plastic wrap and place in the fridge for at least 2 hours or longer. See instructions below to make the cookies right away without having to roll the cookie dough.

Preheat the oven to 350 F. On a lightly floured board, roll out 1/4 of the cookie dough to 1/8 inch thick. Using a cup dipped into flour or a round cookie cutter cut, cut out circles and place on cookie sheets 2 inches apart.  Bake for 10-12 minutes or until edges brown. Let cookies cool for 2 minutes and transfer to a plate to cool completely. Repeat with the rest of the cookie dough.

No-roll cookie instructions
To make the cookies right away without having to wait for the dough to chill just simply take a spoon full of the cookie dough and roll it into a ball. Place the dough onto the cookie sheet and lightly press it down. Bake at 350 F for 10-12 minutes or until lightly brown.

Do you have a favorite dairy-free cookie recipe?

I would love links to dairy-free recipes that you love so I can discover more tasty recipes to help me stay away from dairy products.


Dairy Free Chocolate Pretzel Pie

Looking for an impressive dessert. This dairy-free chocolate pie is so creamy and rich in flavor. The pretzel crust adds a nice touch.


This post contains affiliate links.

 My family loves chocolate pie and every year that is what I make at Thanksgiving. This pie is a great change from serving pumpkin pie. There is nothing wrong with pumpkin pie at Thanksgiving, my family just wants to enjoy a different pie as we already had pumpkin pie in October for my teen's birthday. My teen always requests pumpkin pie for his birthday instead of cake. 

 The Thanksgiving chocolate pie tradition started back in 2013 when I made this creamy mint chocolate pie and my family loved it. My family has from then on requested chocolate pie for Thanksgiving dessert. This year I had to learn how to make a dairy-free chocolate pie as I discovered that a milk allergy was the cause of my severe asthma symptoms. I was not going to let a dairy allergy get in the way of my family enjoying a delicious dessert.

 So I had to find a recipe for a dairy-free chocolate pie that my family and I could enjoy. I came across several online that were gluten-free and dairy-free but I can have wheat so there was no need to make it gluten-free. So I made some modifications and made a delicious pie that my family enjoyed. They could not even tell it was dairy-free. This is a pie that vegan lovers will enjoy.
 
They could not even tell it was dairy-free.

 Dairy-Free Chocolate Pretzel Pie is
~ Dairy-Free
~ Creamy
~ Full of Chocolate Flavor
~ Plant-Based
~ Can be made gluten-free

  Pretzels and chocolate come together for an amazing taste!

 My delicious creamy chocolate pie has a crust that is made from crushed pretzels. The salt in the pretzels just adds wonderful flavor to the chocolate pie, think salted chocolate! For the milk chocolate flavor pie filling, I used dairy-free chocolate chips along with coconut milk. Who knew that coconut milk could turn dark chocolate chips into dairy-free milk chocolate chips. The chocolate chips that I used were from Enjoy LifeYou can also use Nestle Toll House Simply Delicious Allergy-friendly Morsels. The Nestle Toll House chips are my favorite dairy-free chocolate chips. These chocolate chips are allergy-friendly and made for people who follow a vegan diet. If you follow a gluten-free diet you can make this delicious pie gluten-free by using gluten-free pretzels.

You will have a hard time believing this creamy chocolate pie is dairy-free

  This creamy chocolate pie did take a while to make but it was so worth it. I have already made this pie two times as my family loves it. I so thought that it being dairy-free would keep them from eating the chocolate pie but nope, once the pie is made it is gone in two days after everyone eats 2 slices. This pie also tastes great with homemade dairy-free whipped topping

 My family has already requested that I make this pie at Christmas and I will be doing just that but will have to use coconut milk for the almond milk as my daughter has a nut allergy. I may also add a peppermint taste to this pie with pure peppermint extract. I am glad that my daughter lives on her own as her nut allergy and my milk allergy can be challenging when we eat out.

Chocolate and salt make an amazing taste-think salted chocolate


Dairy-Free Chocolate Pretzel Pie

INGREDIENTS
FOR THE CRUST:
3 1/2 cups pretzels crushed into small pieces
1/4 cup brown sugar
6 tablespoons vegan butter, melted

FOR THE GANACHE:
1/3 cup dairy-free chocolate chips
2 teaspoons coconut oil

FOR THE CHOCOLATE PUDDING:
1/4 cup unsweetened cocoa powder
1/4 cup cornstarch
1/2 cup sugar
pinch of salt
1 (13.5oz) canned (not boxed) coconut milk
1 cup unsweetened almond milk
2/3 cup dairy-free chocolate chips
1 tsp vanilla extract
1 tablespoon vegan butter

INSTRUCTIONS

MAKE THE CRUST:
1. Preheat the oven to 350F. Lightly grease a 9-inch pie pan with cooking spray.
2. Place the pretzels in a large bowl and crush into small pieces with a potato masher. Pour into a bowl and add the brown sugar and vegan butter. Stir to combine.
3. Pour into the prepared pan and press into an even layer. Bake for 10-12 minutes until toasted. Let cool for 15-20 minutes before filling with the ganache.

MAKE THE GANACHE:
Melt the chocolate and coconut oil together in the microwave at 50% power for 30-45 seconds, stopping to stir every 15 seconds. Stir until totally smooth. Pour and spread over the bottom of the prepared crust. Let it set slightly before adding the pudding, about 30 minutes.

MAKE THE PUDDING:
1. In a heavy-bottomed saucepan, whisk together the cocoa powder, cornstarch, sugar, and pinch of salt. Over medium heat, while whisking, add the coconut milk and almond milk. Whisk until totally smooth. Continue to whisk until the mixture comes to a gentle boil. Once the mixture bubbles continue to whisk and cook for another 2 minutes until thick. Remove from the heat and stir in the chocolate chips, vanilla, and vegan butter. Set the pan aside and let it cool to room temperature.

2. Pour the pudding into the crust. Smooth, then refrigerate until set, about 2 hours or up to 12 hours.

Top with dairy-free whip topping if desired and or additional pretzels.


Quick & Easy Peppermint Bark~ Dairy Free Version

This peppermint bark is so easy to make and only uses 2 ingredients!


  My son needed a holiday treat for his school party and I was short on time. So I made peppermint bark. His whole class loved the candy and everyone requested the recipe. They were shocked at how easy it was to make. This delicious peppermint candy only needs white chocolate chips and candy canes. It can be made in less than 30 minutes. You will never buy storebought peppermint bark again. You can also make this recipe with milk chocolate chips for a chocolate peppermint bark or if you have a dairy allergy then you can use dairy-free chocolate chips. I wish that I could find dairy-free white chocolate chips but no luck yet.

Quick & Easy Peppermint Bark
   1 bag white or milk chocolate chips (for a dairy-free version use dairy-free chocolate chips)
     1 box 12 count candy canes

Unwrap the candy canes and crush into small pieces. I crushed my candy canes in my blender on chop for a couple of seconds. If you don't have a blender or food processor, you can crush them in a bowl with a potato masher or in a ziplock bag. Set the candy aside and line a baking sheet with a silicone sheet, wax paper, or parchment paper. Place the white chocolate chips in microwave safe bowl and cook on high for 1 and a half minutes. Stir and cook in 30-second increments until melted. Make sure to stir after each 30-second cookings. Do not lick the spoon as doing so will get moisture on the chocolate and cause it to crumbled and not melt. Once the chocolate is melted, stir in the crushed candy canes. Then spread the mixture on the lined baking sheet and smooth it out to cover the entire pan. Let cool for an hour or until hard. Then break the candy into pieces.


Makes a great gift!


  My church was collecting desserts for a school holiday food drive and I decided to place the candy canes and the white chocolate chips into a mason jar so that the family could make the bark. I know that I love cooking with my kids so I want others to have that same joy. I printed the recipe on a photo card and then tied it to the jar. I also added a cute label that I found online. It was such a festive looking gift.

A delicious treat 

  My family loves peppermint bark and always request for me to make it around the holidays. It is such an easy Christmas treat to make and it is also so easy to make for holiday potlucks and Christmas parties. I think this will be the treat this year that I make for the neighbors on Christmas Eve. After Christmas when the candy canes go on sale, I always buy plenty of boxes as they keep until the next Christmas. So if you need a delicious treat for a party or a hostess gift, you need to make this.

Dairy Free Sun Dried Tomato & Artichoke Pizza

Artisan Oils add great flavor to dairy-free pizza!

       I received several Artisan Oils from Latourangelle to facilitate this post.

  The one thing that I miss the most after having to eliminate dairy from my diet is cheese. I have been craving pizza and while dairy-free "cheese" makes a great substitute for cheese on my pizza, it tends to lack the flavor of real cheese. The secret to the great flavor on my pizza is the right toppings and Artisan Oil. It is amazing how using quality oil in cooking can make a difference in flavor. Since my allergy blood test also revealed that I have soy allergies as well as dairy allergies, I have been paying attention to the cooking oils that I am purchasing. Did you know that vegetable oil could contain soy? Even if you are not avoiding soy like me, many vegetable oils also have corn or canola oil in them and those are often loaded with GMO's. So to me, it just makes sense to use quality oil for health reasons and amazing flavor.


The flavor is in the oil

  I discovered LaTourangelle oils and I am loving all the flavors that they carry. It is like having an art studio of oils in my kitchen. I use these oils for more than cooking. The other day I made popcorn in my air popper and drizzled the Avocado oil over the popcorn. The flavor was amazing, even my husband loved it and said: "it does not taste like avocados." This is the guy who hates when I use coconut oil on my popcorn as he says it tastes like coconut flakes, so he was happy that I was out of coconut oil.


French Infused Oils are amazing on pizza

  It was hard to decide which oil to use on my dairy-free pizza so I combined two oils into a bowl. I used a mixture of the French Infused Basil Oil and French Infused Garlic Oil. These two Artisan oils had delicious flavors of garlic and basil, both are great pizza flavors. I spread the oil on my dough instead of using a tomato sauce as I wanted to have the flavor of my sun-dried tomatoes to stand out, I also did not want the soggy crust from using tomato sauce. Did you know that you can make sun-dried tomatoes at home? This Recipe makes it so easy. Make sure to spread some French Infused Garlic Oil on the tomatoes before roasted for great flavor.  I also use sunflower seeds on this pizza as it is a great low-cost alternative for pine nuts.


Homemade pizza crust makes all the difference


 When I make pizza, I also make my own pizza dough. Making pizza dough is so easy and I make it in my bread machine. Check out the recipe for Sweet Potato and Corn Pizza that has my easy recipe for pizza dough. Once you make your own pizza dough you will never buy store bought pizza dough again.


          Dairy Free Sun-Dried Tomato & Artichoke Pizza 

     one batch pizza dough (get the recipe HERE )
1 cup of sun-dried tomatoes
1 tablespoon fresh Rosemary, finely chopped
1/2 cup (about a half can) sliced artichoke hearts
1/4 cup roasted sunflower seeds
4 ounces dairy-free "cheese", I like this brand 
sea salt

1. Place your dough on an oiled stone on a pizza pan and form it with your hands into a circle. Then poke the dough with a fork all over the dough. This is so your dough will not be puffy when it bakes. 
2. Drizzle the two French Infused oils on the pizza dough and spread around with a pastry brush. Start with a small amount so the oil lightly coats the dough, you can always add more if needed. 
3. Place the sun-dried tomatoes evenly all over the pizza dough. Then sprinkle the Rosemary over the tomatoes. 
4. Add the artichoke hearts and sunflower seeds. Then lightly sprinkle salt all over the pizza. 
5. Sprinkle the dairy-free "cheese" over the toppings.
6. Bake at 400F for 20 minutes or until the crust is crisp and golden brown.

For those that can enjoy dairy, this pizza tastes amazing with mozzarella cheese.  So you can add about 1 cup of mozzarella cheese on top of the ingredients before baking.

My next recipe to use these amazing Artisan oils in is Vegetarian Egg Foo Young. I know that the Toasted Sesame Oil will give this dish amazing flavor. I have never cooked with Walnut oil so if you have any recipes using this oil, feel free to leave the link in the comments.


data-matched-content-rows-num="2" data-matched-content-columns-num="2"
Mom knows best